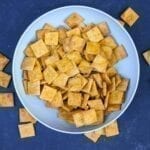
How to Make Homemade Vegan CHEEZ-IT Crackers
This is a veganized copycat recipe of the famous CHEEZ-IT crackers in the original flavor. These taste almost just like the real thing and are pretty easy to make, too!
Ingredients
- 4 tbsp vegan butter, cold (I use the brand Earth Balance-Original)
- 3/4 cup vegan cheddar cheese, shredded (I use the brand Follow Your Heart)
- 2 tsp sweet white miso paste
- 3/4 cup all-purpose flour
- 1/4 cup nutritional yeast
- 1 tsp kosher salt
- 4 tsp ice-cold water
Instructions
- In a medium-sized bowl, combine the butter, cheddar cheese, and miso paste using a fork until it forms into a pretty smooth paste. It is perfectly okay if there is a small number of little bits of the cheddar cheese showing in the end.
- Into another bowl, whisk together the flour, nutritional yeast, and salt.
- Pour the dry mix into the bowl of the cheesy paste and mix/mash with a fork until it is well combined and resembles a fine, crumbly texture.
- Add the ice-cold water into the mixture and mix with a fork until it no longer comes together. Then, press it together with your hands and create a somewhat smooth ball.
- Tightly wrap the dough in plastic wrap and set it in the refrigerator to chill for 1 hour.
- Preheat the oven to 350 degrees Fahrenheit.
- Line 3 large sheet pans with 2 pieces of parchment paper. I use 2 pieces of parchment paper per pan to ensure the bottoms of the crackers don't burn.
- Cut the dough in half. Wrap one-half back up and place it back into the refrigerator while you work on the other half.
- Flour your countertop. Form the piece of dough back into a ball and then smash it down into a disc. Now, flour the top of the dough as well as around a rolling pin.
- Roll the dough into a 1/8th of an inch thick square. Measure the thickness at first if you need to get a rough idea, as it should be pretty thin; otherwise, the crackers will not get crunchy.
- With a pizza cutter or a knife, trim the very outer edges off, so you have a nice, clean square to work with. Save those scraps, as you can simply add it to the other half of the dough in the refrigerator. Vertically cut 1-inch strips and then horizontally cut 1-inch strips out of the sheet of dough. Each cracker should be roughly 1 inch on all 4 sides. They don't have to be perfect, though!
- Poke the middle of each cheez-it with a toothpick, wiggling it around a bit to create a small hole, so it looks a bit more authentic.
- Lightly dust a bench scraper/pastry cutter with flour and scrape up the cheez-its and place them on the sheet pans. They do not have to line up in an orderly manner, and they can lay pretty close to each other, as they're not going to get bigger in the oven.
- Place a sheet pan of the cheez-its into the refrigerator to chill for 10 minutes. In the meantime, continue rolling and cutting the rest of the dough.
- Once chilled, place the sheet pan on the middle rack and bake for 10-12 minutes, rotating the pan halfway through. *Pay VERY close attention to the crackers around the 8-10 minute mark to prevent burning, as everyone's oven heats slightly different. They are ready to come out when they are LIGHT golden brown. If you see the edges turning dark, pull them out.
- Allow the cheez-its to COMPLETELY cool down, or they will not feel crunchy. If they are still slightly soft, pop them back into the oven for another 2-3 minutes.
- Once completely cooled down, store them in an airtight container. If they start to feel soft later on, place the container in the refrigerator. They will get a bit more crunchy again due to the butter solidifying.
Tried this recipe?Let me know how it was!